Showing posts with label DIY. Show all posts

Friday, 26 March 2010

Connecting your laptop to your TV (make your own 7 pin SVideo to RCA cable)

Following on from the article describing how to make a 4 pin SVideo to RCS cable, Anonymous requested the cable for a 7 pin SVideo to RCS cable.  So here are the instructions… note, I haven’t tested this – just info that I’ve put together from the http://www.allpinouts.org/index.php/S-Video_7_PIN site. 

So, if you have a laptop with a 7 pin S-Video output and want to watch a DVD on your TV (that didn’t have an S-Video input), here’s how to make your own cable (and save about R150). 
See below for the wiring – you’ll need a ceramic capacitor in the wiring.
Remember, the S-Video plug does not “carry” video signal and the audio – you will need 2 cables: 1 for the video (this one) and another for audio.
image {Thanks to www.allpinouts.org for the images and diagrams pasted below !}

Video cable:

Here’s a 7 pin S-Video plug: image (plugged into the laptop’s S-Video output, and the TV end soldered onto a RCA jack and plugged into the video-in socket on the TV)

Here’s the RCA plug: image  

Here’s the wiring of the S-Video to RCA cable:
image

Pin S-Video

Description

Pin RCA

1

GND Ground (Y)

Ground

2

GND Ground (C)

Ground

3

Y Intensity (Luminance)

Signal

4

C Color (Chrominance)

Signal through 470pF Ceramic Capacitor

5

- -

- -

6

V Composite Video

- -

7

VGND Composite Ground

- -

Notes (from allpinouts.org):
* Those 7 pin connectors seen on some PC graphics cards are non-standard connectors for carrying S-video.
* Generally the first four pins on those 7-pin connectors on the same places as the standard four pin S-video connector have practically always the same functionality as those pins in S-video connector.
* The other three pins can have then some extra signals which are not part of S-video (usually some pins of those carry composite video and some control signals, but the use of those three extra pins vary quite much).

* Larger capacitor values will also work, but cause picture to become "softer".
* The impedances and signal levels not matched exactly right, but near enough to work acceptably.


image
Audio cable:
The audio cable had a small stereo jack on it and plugged into the laptop’s headphone jack, and the TV end had two RCA male connectors and plugged into the audio-in (“Left and Right”) sockets on the TV.

www.allpinouts.org
While investigating this article I Googled into www.allpinouts.org which is an absolute mine of valuable information regarding pinouts of cables and connectors for all sorts of devices.  If you need to know how to wire up a connector or cable, then www.allpinouts.org will be your last stop!image

Wednesday, 18 November 2009

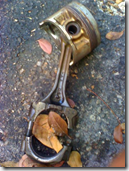
Did you know that over filling your car with oil can cause it to blow the engine? – no jokes!

A colleague has just had a horrible experience!  His car had just been in at a garage for a service and the oil had been replaced.  When he picked up the vehicle he noticed that the oil light was on and so he called the garage owner over and discussed the problem.  The garage owner decided that a top up of oil was required, so he called one of the mechanics to bring more oil.  Some oil was added but the light still didn’t go off.  By this stage, the oil dipstick read over the “full” mark and the garage owner told the mechanic to pour more in…
The mechanic refused, saying that it was too full, but his boss was adamant that more oil was needed, so he ordered him to pour more.
The car was now full, the oil light was still on – but the light was explained away as “it needed to be reset, and he would do some research and call my colleague back.  But you can drive the car – no problem!”.
My colleague nervously agreed, but before leaving said something like: “(nervous agreement), I’ve had an engine blow on me before, so if anything happens, then it’s your responsibility to buy the spares and pay for the labour – everything!”

This was agreed, and he drove the car away with the oil light still burning brightly.

Needless to say, two days later, my colleague’s car’s engine seized and came to a grinding halt on the side of the road!

image   image

A few choice swear-words later.. he grabbed his cell phone and called the garage owner and explained the situation.  An obviously embarrassed garage owner apologised and made good his promise to fix the car.
He picked up the stranded family and is now ferrying them wherever they need to go: school, work, shopping, etc. until the car is fixed.

I would like to have seen that mechanic’s face when the car was towed back into the garage to be fixed!

Moral of the story: do NOT overfill the oil in your car – it could be very expensive!

Technical explanation:
From
http://wiki.answers.com/Q/What_happens_if_you_over_fill_engine_oil: “If you put too much oil in the engine, it raises the oil level high enough that the crankshaft touches it.  The crankshaft will whip the oil, aerating it.  This air in the oil will destroy your engine bearings.  The bearings have a very thin layer of oil on them which keep the bearing and whatever the bearing is against from locking up.  The air will remove the oil layer from the bearing and the bearing will then rub against whatever engine part it is used for.  The bearing will then be shredded and metal parts will go about destroying your engine.  Moral of the story, don't over fill your oil.”
image


Sunday, 8 November 2009

Connecting your laptop to your TV (make your own SVideo to RCA cable)

I have a laptop with an S-Video output and I wanted to watch a DVD on my TV (that didn’t have an S-Video input), so I decided to make my own cable – the ones in the shops were over R150. 
See below for the wiring – you’ll need a ceramic capacitor in the wiring.
I thought that the S-Video plug would “carry” video signal and the audio – I was wrong – I needed 2 cables: 1 for the video and another for audio.
image {Thanks to www.allpinouts.org for the images and diagrams pasted below – I wish I had them when I made my cables!}

Video cable:

Here’s an S-Video plug: image (plugged into the laptop’s S-Video output, and the TV end soldered onto a RCA jack and plugged into the video-in socket on the TV)

Here’s the RCA plug: image  

Here’s the wiring of the S-Video to RCA cable:
image

Pin S-Video

Description Pin RCA
1 Ground (Y) Ground
2 Ground (C) Ground
3 Y - Intensity (Luminance) Signal
4 C - Colour (Chrominance) Signal through 470pF Ceramic Capacitor
Notes:
  • Larger capacitor values will also work, but cause picture to become "softer".
  • The impedances and signal levels not matched exactly right, but near enough to work acceptably.

Audio cable:
The audio cable had a small stereo jack on it and plugged into the laptop’s headphone jack, and the TV end had two RCA male connectors and plugged into the audio-in (“Left and Right”) sockets on the TV.

www.allpinouts.org
While investigating this article I Googled into www.allpinouts.org which is an absolute mine of valuable information regarding pinouts of cables and connectors for all sorts of devices.  If you need to know how to wire up a connector or cable, then www.allpinouts.org will be your last stop!



Tuesday, 21 April 2009

Calculator: The Pool Calculator: how much of what should you pour in to your pool to get it to sparkle?

If you ever needed to figure out (say) how much acid to pour into your pool so that the PH would be adjusted to the ideal? Well, The Pool Calculator (by Jason Linhart) can help you do that, and much, much more....

Simply enter your pool's size and pool surface, then configure your goals, change the units to metric, then you're on your way to getting those answers.

Enter your current chemical levels (test results) and The Pool Calculator tells you how much of each chemical to add to keep your water in balance.

There's even an iPhone app that you can purchase here:
http://www.apptism.com/apps/pool-calculator
or here:
http://download.cnet.com/Pool-Calculator/3000-18495_4-10911482.html

Available calculations include:
- FC = Chlorine
- pH: Raising and lowering
- TA = Total Alkalinity
- CH = Calcium Hardness
- CYA = Stabilizer or cyanuric acid
- Salt
- Borate (Borax)
- CSI = Calcium Saturation Index (similar to LSI = Langelier Saturation Index)
- Recommended ranges for each chemical level
- Volume

See here for a detailed description of each parameter:
http://www.poolcalculator.com/chemistry.html

Here's a step-by-step guide to using the calculator:
1) Change the "units of measure" (top right of the screen)
2) Go to the bottom of the screen, to the "Estimating pool volume" section to calculate the amount of water in your pool. Enter the width, length (average) depth and shape of your pool. This will calculate the number of litres.
3) Take this number and go to the top of the screen and put it into the "Size" of the pool
4) Go to the "Suggested Goal Levels" section (at the bottom of the table) and choose which suggested goal levels you would like to use (Traditional or TroubleFreePool.com's goals. This will set different goal values and adjust the amount of chemicals so that your pool's water reaches those goals. Suggested goal levels will be displayed for FC, pH, TA, CH, and CYA. Suggested goals are simply a starting point. There are many situations that are not covered by these basic guidelines.
5) Your calculator is now set up and in the next steps you can enter the current chemical levels and The Calculator will give you the amounts of chemicals to pour in so that the goals are attained.
For example, if your pH level is 8.0, and the ideal is 7.5 to 8, then you should add 500ml of dry acid.

Note: SWG - Salt Water Chlorine Generator

Saturday, 4 April 2009

Live Traffic Feed


Be notified of
page updates
it's private
powered by
ChangeDetection

Copyright © 2008 HandyTechTipper. All articles are released under the Creative Commons Attribution 2.5 South Africa license, unless where otherwise stated.